
API Docs
Getting Started with our API
All API responses are in JSON unless otherwise specified.
To understand this guide you should have at least a basic knowledge of how the OAuth2 authentication mechanism works.
Our API relies on OAuth2
While convenient, Basic Authentication isn't ideal because the user shouldn't give their username and password to anyone, including applications operating on the user's behalf. Applications that need to work with private information using the API on behalf of a user should use OAuth2.
Instead of usernames and passwords, OAuth2 uses tokens. Tokens provide two big features:
- Limited access: users can review the specific access that a token will provide before authorizing a third party app
- Revokable access: users can revoke authorization to third party apps at any time
OAuth2 is a protocol that lets external apps request authorization to private details in a user's account without getting their password. This is preferred over Basic Authentication because tokens can be limited to specific types of data, and can be revoked by users at any time.
All developers need to register their applications before getting started. A registered OAuth2 application is assigned a unique Client ID and Client Secret. The Client Secret should not be shared.
First, register your application with us
Go to My Apps then click on Register New Application. Fill in the form:
- The
Namewill be shown to users when signing in through our API. - The
Redirect URI rootis the root of the URLs on your servers where you want us to redirect the user to after the user completed the authorization or other direct interaction (e.g. edit profile) on our servers. It is typically something likehttps://example.com/oauth/callback.
At each authorization or API call to us you will be allowed to extend this URL (add further elements to the path, add parameters, etc.) with any information you need to be able to pick up the thread and continue serving the user seamlessly. E.g.
https://example.com/oauth/callback/after_login?user=12345Requests to our servers providing a
redirect_uriwhich does not start with this root URL will be rejected with an error. * Choose which set ofUser sign-up form fieldsyou would like the sign-up form to display and require the user to fill out.Account info (email, password) is always needed for the user to be able to sign into our system.
Contact info (name, address, phone number) will be needed to participate in waste collection, but is not strictly needed for some very basic usage of the system (e.g. checking brigade statistics). If you decide not to require the user to fill this out during sign-up, but still want your users to collect waste through our system, (or you plan your application to work with users who signed up outside your application, and could, therefore, have no contact information) then prepare your application to handle incomplete profiles - see chapter Incomplete profile/account.
- The
In order for our API to respond to requests from your App, you will have to get your App approved by us. You can request approval by clicking on the Request Approval button next to your application on the My Apps page. You'll get notified in email once your App is approved. (On our development servers approval is automatic and happens within a few minutes. On our production servers we conduct a manual approval process that will take longer.)
Example:
| field | value |
|---|---|
| Name | Test app 1 |
| Redirect URI | https://example.com/oauth/callback |
| Client Secret | d1f82bbe88b1f02369a8624db7464459adb34d8c5c0b8e9456d701371236e5f5 |
| Client ID | 1bdf3e0f0aa465d1db00a34fb7e08f220c71c016686a1aea5cba678a4ebc4f2e |
Then, implement this in your application
Note before you actually start implementing
Most OAuth libraries contain all the details described below, and provide you with a much more elegant and simplified interface (as can be seen in the Ruby example later).
So after reading through here, try to find a good OAuth2 library for your chosen environment first, before you consider implementing these details yourself.
We are using version 2 of OAuth - libraries for previous versions will not work.
If you are only interested in accessing publicly available information,
or in other words API endpoints having a public scope,
then please read the Public API endpoints section.
All other API endpoints requires user authorization.
Security requirements
Using SSL is mandatory for all API requests. If you make a request to any of
our API api.terracycle.cn/.../v2/... or Authentication server
api.terracycle.cn/.../oauth... endpoints using the http protocol you will
receive a 403 SSL required response.
1. Send your user to us to log in
Redirect the user's browser to this URL:
https://api.terracycle.cn/oauth/authorize
Parameters
Complete URL you have to send your user to for this example:
https://api.terracycle.cn/zh-CN/oauth/authorize?response_type=code&client_id=0123456789abcdef0123456789abcdef0123456789abcdef0123456789abcdef&scope=public&redirect_uri=https%3A%2F%2Fwww.example.com%2Foauth%2Fcallback%2Fafter_login%3Fuser%3D12345
If you want a different language
If you want a different language than the default, just insert the locale as first thing into the path as seen below: Note: The language you pick should be available in the country you're sending request to.
https://api.terracycle.cn/es-US/oauth/authorize?response_type=code&client_id=0123456789abcdef0123456789abcdef0123456789abcdef0123456789abcdef&scope=public&redirect_uri=https%3A%2F%2Fwww.example.com%2Foauth%2Fcallback%2Fafter_login%3Fuser%3D12345
(For more details please refer to Locale/language on sign in and authorization screens.)
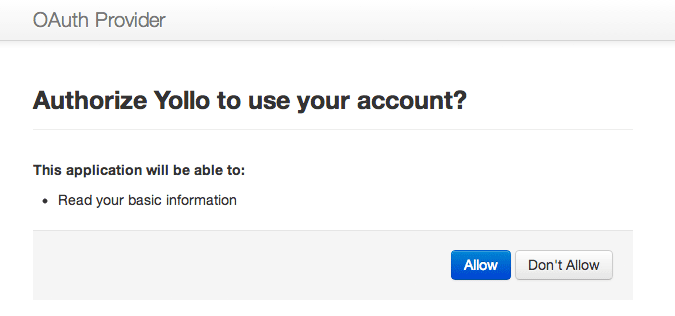
2. The user (hopefully) authorizes your application
Note: You can customize the look of the pages we show to your user during the sign in process (see CSS field and the preview links when you edit your application) to make them look as if they were pages from your own site - this way the user has a seamless experience and is not confused by suddenly finding themselves on a different looking site. For verified partners who have a contract with us specifying this we also pre-authorize their apps, so the user will not even encounter the authorization dialog (shown below), making their experience completely seamless.
If the user logged in succesfully (and if they haven't used your application before) we will show them a dialog asking them to give permission to your application to access their account and data. The list of permissions displayed is based on which scopes you specified in your URL/request above.
3. We redirect the user back to your site with a code
If the user authorizes your application, we redirect them back to your redirect
URI with a GET request providing a temporary code in a code parameter.
Example URI we redirect the user to:
https://www.example.com/oauth/callback/after_login?user=12345&code=bf2356cf0677f1589e581db382d633fd58f7302751f15e87c6e804f8dc0d7778
From this the code you received is: bf2356cf0677f1589e581db382d633fd58f7302751f15e87c6e804f8dc0d7778
This code expires in 600 seconds (10 minutes).
4. You exchange code for an access_token
Now you should exchange the received code for an access_token by sending a request to us:
POST https://api.terracycle.cn/oauth/token
Parameters
| Param name | Description |
|---|---|
| grant_type | Required string - has to be the value authorization_code |
| code | Required string - The code you received in the previous step |
| client_id | Required string - The Client ID you received from us when you registered your application. |
| redirect_uri | Required string - The exact same redirect URI you've provided during step 1 Note: Check your HTTP library whether for POST parameters it requires URL-escaped strings (in which case you should definitely URL-escape at least this string,although best practice would be to URL-escape all strings), or it does the URL-escaping internally. The command line utility curl does URL-escaping when called like in the example below. |
| client_secret | Required string - The client secret you received from us when you registered your application. |
Example
$ curl \
 --data 'grant_type=authorization_code' \
 --data 'code=bf2356cf0677f1589e581db382d633fd58f7302751f15e87c6e804f8dc0d7778' \
 --data 'client_id=0123456789abcdef0123456789abcdef0123456789abcdef0123456789abcdef' \
 --data 'client_secret=1234567890abcdef0123456789abcdef0123456789abcdef0123456789abcdef' \
 --data-urlencode 'redirect_uri=https://www.example.com/oauth/callback/after_login?user=12345' \
 https://api.terracycle.cn/zh-CN/oauth/token
Response
By default, the response will be JSON and will contain the access_token:
{
  "access_token": "acce55acce55acce55acce55acce55acce55acce55acce55acce55acce55acce",
  "token_type": "bearer",
  "expires_in": 7200,
  "refresh_token": "2345678901abcdef0123456789abcdef0123456789abcdef0123456789abcdef",
  "scope": "public"
}
From this the access_token is: acce55acce55acce55acce55acce55acce55acce55acce55acce55acce55acce
Note: If you receive an invalid_grant error instead (especially during manual experimentation during development), chances are your code (which is valid for only 10 minutes) has expired.
In this case just start again from the user sign in.
5. Use the access_token in each of your API calls to us
The access token you received enables you to issue requests to the API on behalf of the user.
GET https://api.terracycle.cn/zh-CN/v2/stats?access_token=...access_token...
Example:
$ curl -G \
  --data 'access_token=acce55acce55acce55acce55acce55acce55acce55acce55acce55acce55acce' \
  https://api.terracycle.cn/zh-CN/v2/stats

{
  "stats": {
    "people_collecting": 35413526,
    "waste_collected": 2494276733,
    "money_raised": 5491180.61,
    "money_raised_formatted": "$5,491,180.61"
  }
}

$ _
Invalid token
If you are trying to access an endpoint using an invalid token or no token at all you will receive a 401 Unauthorized error response.
You can receive an invalid token response for the following reasons:
- if the token is missing altogether
- if the token has expired
- if the token has been revoked
- the endpoint's required scope is missing from the token
HTTP/1.1 401 Unauthorized
Content-Type: application/json; charset=utf-8
Content-Language: en-US
{
  "error": "unauthorized",
  "message": "invalid token"
}
Example implementation
Ruby
Here is the bare minimum code you need in order to use OAuth. It should not be used on a production site as is, it is only meant to be a quick example so you get the idea of how the oauth Authorization flow works.
Add OAuth gem to your Gemfile
gem 'oauth2'Initialize the oauth client
YOUR_CLIENT_ID = '0123456789abcdef0123456789abcdef0123456789abcdef0123456789abcdef'
YOUR_CLIENT_SECRET = '1234567890abcdef0123456789abcdef0123456789abcdef0123456789abcdef'
YOUR_REDIRECT_URL = 'https://www.example.com/oauth/callback' # An URL where you want us to redirect the user to after authorization - it has to start with the redirect URI you specified when you registered your application.

client = OAuth2::Client.new(YOUR_CLIENT_ID,
                            YOUR_CLIENT_SECRET,
                            :site => 'https://api.terracycle.cn',
                            :token_method => :post)
When your user wants to sign in, redirect them to our authorize_url
redirect client.auth_code.authorize_url(:redirect_uri => YOUR_REDIRECT_URL, :scope => 'account_read')At this point the User will be temporarily on our site, asked to sign in and authorize your App. If all is good, the User will be redirected to
YOUR_REDIRECT_URL.Inside
YOUR_REDIRECT_URLnew_token = client.auth_code.get_token(params[:code], :redirect_uri => YOUR_REDIRECT_URL) session[:access_token] = new_token.token redirect '/page_using_our_api'Inside
'example.com/page_using_our_api'access_token = OAuth2::AccessToken.new(client, session[:access_token]) response = access_token.get("/zh-CN/v2/account") user_account_info = JSON.parse(response.body)
Public API endpoints
API endpoints having a public scope does not require all the above steps, they do not require the user to authorize the application. This is called the Client Credentials flow of the OAuth2 spec.
1. Send a post request from your application
POST https://api.terracycle.cn/zh-CN/oauth/token
Parameters
| Param name | Description |
|---|---|
| grant_type | Required string - has to be the value client_credentials |
| client_id | Required string - The Client ID you received from us when you registered your application. |
| client_secret | Required string - The Client Secret you received from us when you registered your application. |
Complete example using curl:
Request
$ curl \
 --data 'grant_type=client_credentials' \
 --data 'client_id=0123456789abcdef0123456789abcdef0123456789abcdef0123456789abcdef' \
 --data 'client_secret=1234567890abcdef0123456789abcdef0123456789abcdef0123456789abcdef' \
 https://api.terracycle.cn/zh-CN/oauth/token
Response
{
  "access_token": "acce55acce55acce55acce55acce55acce55acce55acce55acce55acce55acce",
  "token_type": "bearer",
  "expires_in": 7200,
  "refresh_token": "2345678901abcdef0123456789abcdef0123456789abcdef0123456789abcdef",
  "scope": "public"
}
Response
Use the token the same way as you would with an access grant type of token described above.
Finally, make calls to our API
The root URL for all of our OAuth and API calls is: https://api.terracycle.cn/ -
this is what you should specify as site, site_url or similar for your OAuth2 library.
This is Version 2 of our API. Therefore, all API calls (but not the OAuth calls!)
have to to start with /v2 in their path,
and this is not specified in the API reference pages.
All API calls should also provide an access_token as parameter to the request.
For GET requests this could be appended to the URL - like any other GET parameter - simply by string concatenation (and because it is just a long hex string, it doesn't actually need URL-encoding), but most HTTP libraries provide an interface for setting parameters even for GET requests in a more elegant (and less error-prone) way; and since for POST requests you should definitely use the facilities of the HTTP library of your development environment/framework to set parameters, you might as well just do the same for GET requests as well and be done with it - in fact it would probably even make your code simpler.
Example: top-level statistics
We assume you already have an access_token since we already detailed the steps of
getting an access_token above. So here we will only show the actual request.
What the API reference page says
Request
GET /stats
Response
HTTP/1.1 200 OK
Content-Type: application/json; charset=utf-8
Content-Language: en-US
{
  "stats": {
    "people_collecting": 35413526,
    "waste_collected": 2494276733,
    "money_raised": 5491180.61,
    "money_raised_formatted": "$5,491,180.61"
  }
}
What the API reference page does not mention, but you have to add to every request:
- the root URL:
https://api.terracycle.cn/zh-CN - the API version path:
/v2 - the
access_tokenparameter
Since these are required for all API requests, we might not document these for all the individual API endpoints.
We recommend you to start by creating a function that does this, and then send all API calls through that function.
Request in its final form
(GET is also implied by curl when no other parameter is given just an URL.)
$ curl -G \
 --data 'access_token=acce55acce55acce55acce55acce55acce55acce55acce55acce55acce55acce' \
 https://api.terracycle.cn/zh-CN/v2/stats
Response
Header
This is just an example - note that header fields other than the ones specified in the API reference are subject to change, depending on e.g. what kind of webserver we currently run the API on.
HTTP/1.1 200 OK
Cache-Control: max-age=0, private, must-revalidate
Content-Language: en-US
Content-Type: application/json; charset=utf-8
Date: Wed, 19 Jun 2013 23:49:55 GMT
Etag: "70630c37de529697b779bbc9dac5f8b3"
Server: thin 1.5.0 codename Knife
Vary: Accept-Encoding
X-Rack-Cache: miss
X-Request-Id: 0f6c73841e840236ef3cbf44066a0069
X-Runtime: 0.088399
X-Ua-Compatible: IE=Edge,chrome=1
Connection: keep-alive
Body
{
  "stats": {
    "people_collecting": 35413526,
    "waste_collected": 2494276733,
    "money_raised": 5491180.61,
    "money_raised_formatted": "$5,491,180.61"
  }
}
Actually, the body will be like this:
{"stats":{"people_collecting":35413526,"waste_collected":2494276733,"money_raised":5491180.61,"money_raised_formatted":"$5,491,180.61"}}
we just show it reformatted into a more human-readable form throughout this documentation to make understanding easier; both result in the exact same JSON object when parsed properly, we just wanted show the actual layout here for people who cannot or don't want to use a JSON parser and were hoping to depend on line endings in our output - bad news, there aren't any.
Refresh Tokens
Access tokens expire after 2 hours. You will receive a 401 Unauthorized error when using an expired access token. Your application can request a new access token any time using the refresh token you received when you have requested your access token.
Please note that Refresh tokens MUST be kept confidential in transit and storage, and shared only among the authorization server and the client to whom the refresh tokens were issued.
When requesting a new access token using a refresh token you will also receive a new refresh token to be used to request yet another access token, should the new access token expire.
1. Requesting a new access token
POST https://api.terracycle.cn/zh-CN/oauth/token
Parameters
| Param name | Description |
|---|---|
| grant_type | Required string - has to be the value refresh_token |
| refresh_token | Required string - the refresh token you received from us when you requested your access token |
| client_id | Required string - The Client ID you received from us when you registered your application. |
| client_secret | Required string - The Client Secret you received from us when you registered your application. |
Make sure you add the following request header if your HTTP library does not add it for you:
Content-Type: application/x-www-form-urlencoded;charset=UTF-8
Complete example using curl:
Request
$ curl \
  --data 'grant_type=refresh_token' \
  --data 'refresh_token=2345678901abcdef0123456789abcdef0123456789abcdef0123456789abcdef' \
  --data 'client_id=0123456789abcdef0123456789abcdef0123456789abcdef0123456789abcdef' \
  --data 'client_secret=1234567890abcdef0123456789abcdef0123456789abcdef0123456789abcdef' \
 https://api.terracycle.cn/zh-CN/oauth/token
Response
{
  "access_token": "acf052e482ddea45a3cb2574951f62cec7c31335bfb40e02e5f7c477085a4438", # New access token
  "token_type": "bearer",
  "expires_in": 7200,
  "refresh_token": "9f762d12ac78864e241e56db98a8d61f582ed029ae888d9e546f799f7ea440ae", # New refresh token
  "scope": "public"
}
Next steps
After this walkthrough, for more details please refer to the chapters under the API Reference section on the left.